Category Archives: Grains

Disgustingly Easy Super Cheesy Better Than Store Bought Crackers

I first started making these when my daughter became addicted to a pricey store-bought cheese cracker. I couldn’t have afforded her ‘habit’ without this recipe. The best part, for me, is that they can be so easily adapted to accommodate food allergies, taste preferences, and seasonal influences. And yes, it’s another ratio recipe.

Ingredients:

3 Parts Your favorite firm cheese, shredded (Use really sharp cheddar if you want to replicate They Who Must Not Be Named’s crackers.)

1 – 2 Part(s) Baking Mix (ambient humidity affects this recipe greatly)

Milk or water

Toppings to add just before baking, if desired


Instructions:

Preheat oven to (US) 350F (or your local equivalent).

Melt the cheese over medium/low heat on the stovetop, stirring constantly.

IMG_20131109_172407_033

Add a splash or two of milk to thin out the cheese. Keep stirring over the heat until it is like a thick potato soup.

IMG_20131109_172538_783

If you want to add dried herbs or veggie bits, now is the time to do so.

Turn off the stove, but keep the pot on the burner.

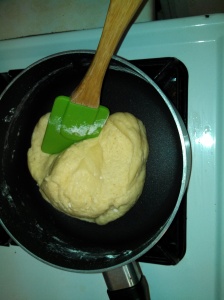
Add the baking mix a handful at a time, stirring each addition in before adding the next. When you find yourself chasing a big lump around the pot, it’s ready to be turned out onto a baking mix sprinkled flat surface for the next step.

IMG_20131109_172645_729

Roll out to 1/8 – 1/4″ thickness and cut into desired shapes. I like to use cookie cutters, but some people prefer to just slice the whole slab into squares or rectangles.

Use a fork to poke holes in the center of each cracker after transferring to ungreased baking sheets. Sprinkle with more cheese or crushed nuts at this point, if you want them to be topped.

Bake until golden brown (about 15-20 minutes, give or take).

Transfer to a cooling rack.

Enjoy!

Notes:

If the dough in the pot is really greasy and not coming together after you have added all of the baking mix, add milk (or water) a splash at a time until it comes together. Not more than 1/4 cup, though, or you’ll end up with really thin flat biscuit-like things, not crackers at all.

If fully cooled before being stored in an airtight container, these crackers have a shelf life of… Hmmm. I have no idea – they’re always gone within a week of baking. so they last at least a week. Probably longer, but I can’t say for sure.

Do NOT (I repeat DO NOT) microwave the cheese – the end result is not pretty. It’s not edible. It does make for fabulous home defense weaponry, if you can get the intruder to eat one.

Microwaved cheese makes these crackers way too hard. Not the ‘oh dear that’s a really crunchy cracker’ kind of too hard, but the ‘honey call the dentist I just broke three teeth’ variety.

And, as I found out this week, always make sure the oven is set to Bake, not Broil, or this happens:

IMG_20130922_124017_599

Leave a comment

Filed under All Recipes, Bites, Breads, Gluten Free, Grains, Parties, Techniques, Tips and Tricks, Uncategorized, Vegetable-arian

Baking Mix

I blame my sister Bonny for this one. She was on this ‘make-a-mix’ kick for a good couple of years before we figured out how to make our own baking mix without having to purchase industrial shelf-stable shortening that we couldn’t really afford. The only drawback to it is that you have to store it in an airtight container in the freezer. Not the fridge; and definitely not the cupboard. Use it the same way you use your favorite boxed baking mix, and enjoy the savings.

Super Basic (mix up a little bit as you need it) Recipe:

1 C Flour

1 1/2 tsp Baking powder

1/4 tsp Salt

1 TBSP Room temperature stable fat/oil:  this can be shortening, lard, butter, coconut oil, or chilled olive or grapeseed oil, or even rendered fat*

Instructions:

Combine everything in the blender or food processor (or you can whisk it by hand, but that takes a very long time and a rather strong arm). Process until the fat is completely absorbed and the whole mix is a powder. Store up to 6 months in an airtight container in the freezer. I label my stuff with the date to toss so I can keep track.

Big Batch (keep it in the freezer) Recipe:

6 C Flour

3 T Baking powder

1 tsp Salt

1/3 C Room temperature stable fat/oil

Notes:

The ratios do change as you increase the overall volume. Slightly less salt is required as you get larger amounts, while the fat content goes up a smidge. 

The other thing to keep track of is your fat/oil. Some things go rancid faster than others, while some things have stronger or softer flavors than others.

Coconut oil has a strong scent, but almost no flavor. It is also still solid at room temperature and doesn’t go rancid very fast (one of the reasons you find it in so many products).

*Rendered fat – the fat or grease that is left in the pan after dry-cooking any meat such as pork, lamb,  or duck. Bacon grease blends in to the baking mix beautifully, but will impart a very salty bacon flavor on milder recipes. My favorite coffeecake recipe came out too salty, for example. But my biscuits and gravy turned out great!

For a gluten free mix, use equal parts brown rice, tapioca, and oat flours in place of the regular flour.

For vegans, I advise the use of Dr. Bronner’s coconut oil for multiple reasons, not least of which is that it is organic and coconut oil has more nutritional value than the other non-meat options.

Leave a comment

Filed under All Recipes, Bites, Breads, Grains, Tips and Tricks, Uncategorized, Vegetable-arian

Hoe Cakes

For the Celiac in your life, traditional Hoe Cakes are an easy ‘unbread’ to make. They can make a tasty alternative to pancakes when drizzled with honey or syrup. Or serve them plain with soup, chili, or sausage gravy for a change from crackers, bread, or biscuits.
  
Ingredients:
16 wz (453.5 g) Yellow Cornmeal (glutenfree, of course!)
1 pinch Salt
16 fz (473 mL) Boiling Water
2 wz (256.5 g) salad oil
Enough high heat cooking oil to fill the pan to frying depth (I prefer a 50/50 blend of peanut and sunflower oils, but you can use any mild-flavored cooking oil)
  
Instructions:
Gather your ingredients.
Preheat oven to 200 degrees F (94 degrees C).
Heat the oil in a heavy-bottomed frying pan over medium heat (or flame). Oil is ready when water droplets flicked over it ‘dance’ across the surface and evaporate.
Combine the first two ingredients in a large mixing bowl.
Stir in the boiling water. Mix until well combined.
Cover and let rest for 3-5 minutes, or until cool enough to shape without burning your hands.
Coat your hands with salad oil. Shape cornmeal mixture into palm-sized patties and use a spatula to gently slide into hot oil.
Fry until golden brown on both sides, trying to flip them only once.
Drain over pan before placing on a warm plate or platter in the oven to keep warm until you are ready to serve them. 

VARIATIONS (This basic recipe can easily be modified to be sweet or savory, depending on your preference):

Add your favorite grated cheese to make ‘Cheesy Hoes’

Swap 1/4 of the boiling water with honey to make ‘Hot Sticky Hoes’

Add minced parsley or spinach, plus chopped Prosciutto to make ‘Green Hoes with Ham’

Add minced garlic to make ‘Stinky Hoes’

Use blue cornmeal flour instead of yellow for ‘Blue Suede Hoes’

As you can see, my family has fun with both the variations and the names we give them, but why bother to play with your food if it isn’t any fun?

Leave a comment

Filed under All Recipes, Bites, Breads, Gluten Free, Grains, Parties, Sides, Uncategorized, Vegetable-arian